How To Install GCC On Ubuntu 18.04 LTS
Provides all the steps required to install the GCC Compiler on Ubuntu 18.04 LTS and getting started with C/C++ using Hello World.
C++ is one of the popular programming languages and the applications developed using it are very fast as compared to the modern programming languages. The GNU Compiler Collection i.e. GCC is the de-facto compiler used to compile and build the C/C++ programs and applications on the Linux system. GCC is a collection of compilers and libraries used to develop applications using C, C++, Objective-C, Fortran, Ada, Go, and D programming languages. This tutorial provides all the steps required to install GCC on the popular Linux distribution Ubuntu. It provides the steps required for Ubuntu 18.04 LTS, though the steps should be similar for other versions of Ubuntu and other distributions of Linux.
Notes: The newer version of this tutorial is available at How To Install GCC On Ubuntu 20.04 LTS.
Install GCC
In this step, we will install the default GCC available on the official repositories of Ubuntu. Install the default GCC using the commands as shown below.
# Refresh the Packages Index
sudo apt update

# Install build-essential to install gcc, g++, and make
sudo apt install build-essential

# Install manual pages
sudo apt-get install manpages-dev

# Verify the installation
gcc --version

# The GCC version from Ubuntu
gcc (Ubuntu 7.5.0-3ubuntu1~18.04) 7.5.0
Copyright (C) 2017 Free Software Foundation, Inc.
This is free software; see the source for copying conditions.  There is NO
warranty; not even for MERCHANTABILITY or FITNESS FOR A PARTICULAR PURPOSE.
The above-mentioned commands installed GCC 7.5 on Ubuntu 18.04 LTS while writing this tutorial. This is how we can install and verify the GCC on Ubuntu.
Install Multiple GCC
In the previous step, we have installed the default GCC i.e. GCC 7.5.0 which is not the latest one. In this section, we will install the latest GCC using the PPP. The most recent version of GCC available while writing this tutorial is 10.1.0. Use the below-mentioned commands to add the PPA and install the most recent version of GCC.
# Prerequisites
sudo apt install software-properties-common

# Add the PPA
sudo add-apt-repository ppa:ubuntu-toolchain-r/test
It will take some time to add the repository. Once it gets ready, it will ask to press Enter Key to continue adding it. It might fail to retrieve the gpg key. In such a case, we might need to add the PPA manually using the commands as mentioned below. Make sure to have system backup before executing the below-mentioned commands. You may also continue with the next steps to start programming with C/C++ using the default GCC installed in the previous section.
If required, we can manually add the GCC PPA as shown below.
# Edit sources
sudo nano /etc/apt/sources.list.d/toolchain.list

# Update the content
deb http://ppa.launchpad.net/ubuntu-toolchain-r/test/ubuntu precise main
deb-src http://ppa.launchpad.net/ubuntu-toolchain-r/test/ubuntu precise main

# Fix key error
sudo apt-key adv --keyserver keyserver.ubuntu.com --recv-keys 1E9377A2BA9EF27F

# Refresh the packages list
sudo apt update

# Dist upgrade if not done recently
sudo apt dist-upgrade
Now install the most recent version of GCC using the commands as mentioned below.
# Install GCC 10
sudo apt-get install gcc-10 g++-10
We can also install the older version of GCC using the commands as mentioned below.
# Install GCC 9
sudo apt-get install gcc-9 g++-9

# Install GCC 8
sudo apt-get install gcc-8 g++-8
This is how we can install multiple versions of GCC on the same system. We can use the below-mentioned commands to switch among the installed GCC.
# GCC 10 alternative
sudo update-alternatives --install /usr/bin/gcc gcc /usr/bin/gcc-10 100 --slave /usr/bin/g++ g++ /usr/bin/g++-10 --slave /usr/bin/gcov gcov /usr/bin/gcov-10

# GCC 9 alternative
sudo update-alternatives --install /usr/bin/gcc gcc /usr/bin/gcc-9 90 --slave /usr/bin/g++ g++ /usr/bin/g++-9 --slave /usr/bin/gcov gcov /usr/bin/gcov-9

# GCC 8 alternative
sudo update-alternatives --install /usr/bin/gcc gcc /usr/bin/gcc-8 80 --slave /usr/bin/g++ g++ /usr/bin/g++-8 --slave /usr/bin/gcov gcov /usr/bin/gcov-8

# GCC 7 alternative
sudo update-alternatives --install /usr/bin/gcc gcc /usr/bin/gcc-7 70 --slave /usr/bin/g++ g++ /usr/bin/g++-7 --slave /usr/bin/gcov gcov /usr/bin/gcov-7

# Switch active GCC
sudo update-alternatives --config gcc
The output of the above-mentioned commands is as shown in Fig 1.
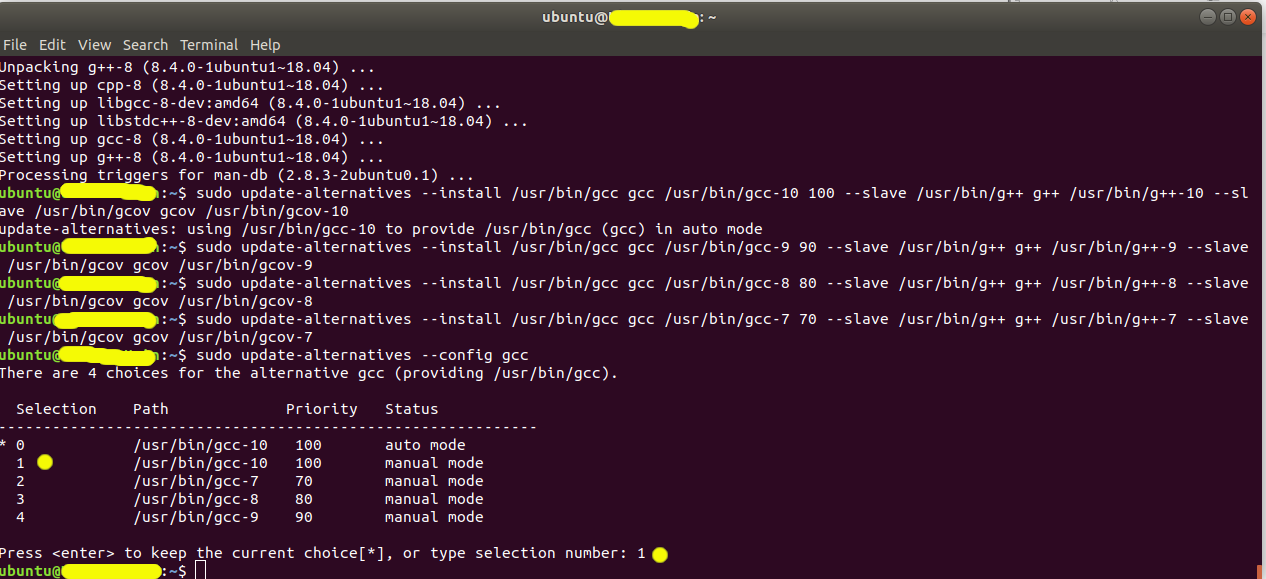
Fig 1
Getting started with C++ - Hello World
Create a file named hello.cpp and update the program as shown below.
#include<iostream>

using namespace std;

int main() {

	cout << "Hello World\n";

	return 0;
}
Now use the below-mentioned commands to compile, build, and execute the program.
# Compile and build the program
g++ hello.cpp -o hello

# Execute the program
./hello

# Output
Hello World
These commands will compile, make, and execute the program to print Hello World on the console.
Getting started with C - Hello World
Create a file named hello.c and update the program as shown below.
#include<stdio.h>

int main() {

	printf( "Hello World\n" );

	return 0;
}
Now use the below-mentioned commands to compile, build, and execute the program.
# Compile and build the program
gcc hello.c -o hello

# Execute the program
./hello

# Output
Hello World
These commands will compile, make, and execute the program to print Hello World on the console.
Summary
This tutorial provided the steps to install GCC on Ubuntu 18.04 LTS. It also showed how to install multiple versions of GCC on the same system using the PPA of GCC. In the end, it provided the example programs to print Hello World on Console using C and C++.


